| | | | |
| |

|
|
Brigitte tap-dances her way into a new gig - and a new finish on her hardwood floor. For this job you'll need to use several different kinds of sanders: a drum sander, an edger and a vibrating sander. The drum sander is normally used with coarse grit sandpaper for the first pass. But it can gouge the floor. If you have plenty of time and want a flawless finish, use the vibrating sander for the entire job.
 |
 |
 |
 |
 |
 |
|
 |
DO keep the sanders moving constantly and smoothly.
|
|
DON’T tap dance on your hardwood floors!
|
|
 |
 |
 |
 |
That Girl’s Got Grit
Smo-o-o-o-o-o-th. A gleaming finish on your hardwood floor requires a gentle touch and a lot of patience.
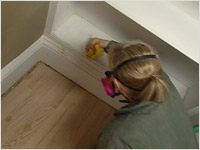
- First, safety equipment. You need to use a breathing mask to keep the fine wood dust out of your lungs. This is very important! And the sanders are loud so protect your hearing with earplugs. Safety glasses are the finishing touch – the more Darth Vader-like, the better. (see fig. A)
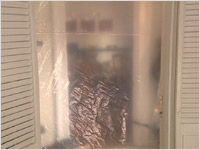
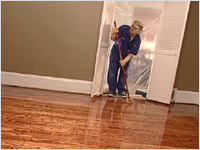
- Seal off the room to prevent dust from circulating throughout your house. Don’t forget to seal off the cold air return as well. Get your pets out of the house. (see fig. B)
 |
|
 |
| Fig. A |
|
Fig. B |
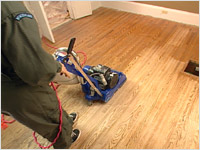
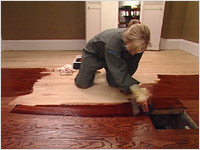
- Remove the quarter round and get the drum sander ready. The first pass is done using very coarse grit sandpaper. Keep the sander moving constantly at a consistent pace to prevent gouges. When the sandpaper starts to lose its effectiveness, replace it with a fresh roll. (see fig. C)
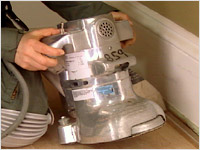
- After you have completed the first pass, use the edger and the SAME grit sandpaper to complete the areas close to the wall. To avoid gouges near the wall, tip the edger back when you start it so the sandpaper portion is not in contact with the floor immediately. (see fig. D)
 |
|
 |
| Fig. C |
|
Fig. D |
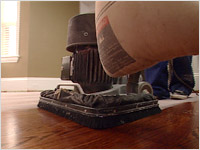
- Now it’s time for the vibrating sander. Use medium grit sandpaper for the second pass. Use medium grit sandpaper with the edger this time around too. Always use the same grit sandpaper with the edger as you do the larger machine. (see fig. E)
- It’s time for the final pass with fine grit sandpaper. But before you do this, fill any gaps or holes with wood filler.
- When you have completed the final pass, the next step is very important. Dusting! You must dust and vacuum carefully, wipe down the walls and remove any remaining dust from the floor with tack cloth. Even small dust motes mar the gleaming finish of hardwood. (see fig. F)
 |
|
 |
| Fig. E |
|
Fig. F |
- Your hardwood now needs some personality and some protection – stain and a clear protective finish. If the floor is large and requires more than one can of stain, mix some from each of the two cans together in a tray to make sure the colour is uniform.
- Make sure the area is well ventilated.
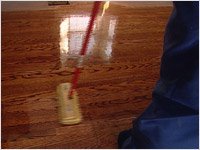
- Working in small areas, using a lint-free sponge applicator, apply the stain going with the grain of the wood, not sideways across the grain. (And don’t stain yourself into a corner) (see fig. G)
- Allow the stain to stand according to the manufacturer’s directions then lift the stain using another lint-free cloth.
- Allow the stain to dry thoroughly.
- The clear finish for hardwood should be treated like a good martini – stirred, not shaken. We don’t want air bubbles. Using a varnish applicator, apply the clear finish smoothly and evenly. (see fig. H)
 |
|
 |
| Fig. G |
|
Fig. H |
- This time you want to seal off the room to keep dust OUT. You don’t want dust or pet hair floating in and settling on your new finish. Allow the finish to dry thoroughly.
- Think you’re finished? Not quite. You want your floors to look their best and last for a long time so persevere. This is where the “patience” part of hardwood floors comes in. Using the vibrating sander and very fine grit sandpaper, do a pass over the varnished floor. (see fig. I)
- Dust, dust, dust. Then apply the second coat of clear finish. Seal off room. Allow to dry thoroughly.
- Think you’re finished now? Nope. One more pass with very fine grit sandpaper. Dust, dust, dust. Third (and last, hurray!) coat of clear finish. Seal off room. Allow to dry. (see fig. J)
 |
|
 |
| Fig. I |
|
Fig. J |
- Enjoy your new gleaming floors. And no tap dancing.

| Dance shoes, wardrobe, extras and location
|
|
Malabar Ltd.
1545 Merivale Rd.
Ottawa, ON K2G 3J4
613-225-8374
|
|
|
|