| | | | |
| |

|
|
The open-beamed roof of a pergola covered with draping branches of flower or grape fines make a graceful transition into a garden area. Brigitte’s pergola also serves a practical purpose – a support for the gate that means her backyard spa meets local building codes.
 |
 |
 |
 |
 |
 |
|
 |
DO make sure to install the support posts deeply into the ground. Solid support posts means a solid pergola.
|
|
DON’T forget to call before you dig. A cut phone line is inconvenient. A severed gas line is extremely dangerous.
|
|
 |
 |
 |
 |
Leading You Down the Garden Pathway
- “Pergola” refers to an outdoor covered pathway with an open-beamed roof. Upright pillars support the lintels and rafters that make up the roof. Before beginning this project, walk around the area where the pergola is to be placed and carefully plan out the finished product. Don’t scrimp on the height of your pergola. You don’t want people to feel crowded, and you need to allow some room for flowering vines of grapes to hang down from the open beams. Also consider the angle of the sun, how it will look from the house and from the street, and what purpose you want it to serve. (Brigitte included a gate and a garbage storage area in her plan.)
 |
|
 |
| Fig. A |
|
Fig. B |
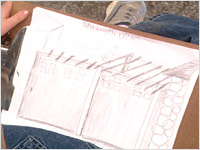
- When you know exactly what you want, measure carefully, draw a plan and determine what materials you need. Brigitte chose cedar for her project but pressure-treated lumber is also an option. (see fig. A)
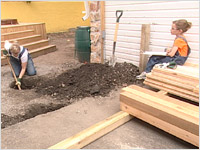
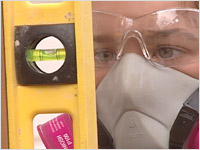
- The first step in building the pergola is the sinking of the support posts. But before you do this, call the local utilities to mark the location of gas, phone, electrical and water lines. Each province has a central number to call that checks for most of the utilities. Please CALL BEFORE YOU DIG! (see fig. B)
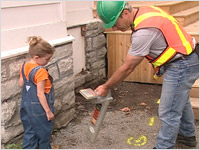
- Brigitte discovered that the holes for her support posts would be very close to the gas line. She followed the advice of Ryley, her wise-beyond-her-years assistant, and chose to dig the holes by hand instead of using a power auger. Digging too close to gas lines with a power auger would be risky. (see fig. C)
 |
|
 |
| Fig. C |
|
Fig. D |
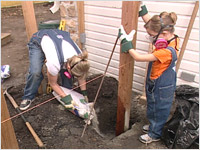
- Place the support posts in the hole and fill with Quick Cement. It can be harmful to breathe in the cement dust so wear a protective breathing filter. Follow the product instructions to add the appropriate amount of water. (see fig. D)
- And ALWAYS use a good moisturizer.
- Use a level to make sure that each post is straight. Let the cement dry overnight. (see. fig. E)
- Take some time out to have a snack and share a few jokes. (see fig. F)
 |
|
 |
| Fig. E |
|
Fig. F |
- What do you call a bear stuck in the rain? (a.) A Drizzly Bear!!
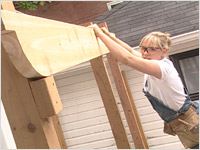
- Next, you want to measure, cut and install the 2 x 10s for the lintels, or headers. These are the pieces of wood that “frame” each end of the pergola. They are placed at the top of the support posts at the desired ceiling height. Measure the width of the pergola from the outside edge of the support posts and then add six to ten inches to each end. This allows you to create a decorative overhang. You will need four headers altogether, two for each end. (see fig. G)
- Using a pencil, mark the pattern that you want to use for the decorative overhang on to the wood. Use a jig saw to cut around the pattern. (see fig. H)
 |
|
 |
| Fig. G |
|
Fig. H |
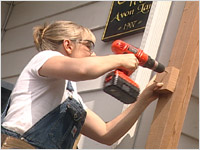
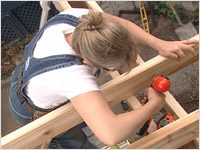
- These pieces of wood are heavy so you want to make this as easy for yourself as possible. Before you even lift the prepared header, on the support posts, measure where the header will be placed and make a pencil mark. Now take two small spare pieces of wood with straight edges and temporarily screw them into place underneath this pencil line. These are the supports for the header to hold it in place and level while you put the screws in. (see fig. I)
- When the header is screwed in, removed the support block. Continue to install the other three header boards in the same manner. There are two on each side.
- Cut off the tops of the support posts level to these headers. (see fig. J)
 |
|
 |
| Fig. I |
|
Fig. J |
- What did the Monster eat after the dentist pulled his tooth? (a.) The dentist!
- The rafters are prepared in the same way as the headers but using 2 x 8 boards instead. Measure the length of the pergola and then add the required amount of extra wood for a decorative overhang. Mark and cut out the pattern for each end of each rafter. (see fig. K)
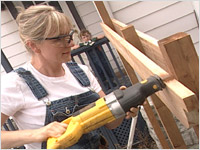
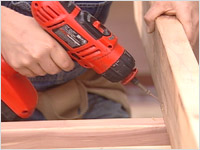
- The rafters are installed perpendicular to the headers. Start by lifting all the prepared rafters up on to the top of the pergola. Lie each one flat and use these as a platform while you work. Starting at one end, install each rafter by “toenailing” it in to place. This means the screws are installed at an angle into the wood. (see fig. L)
 |
|
 |
| Fig. K |
|
Fig. L |
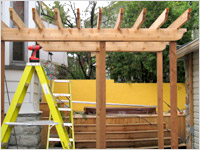
- When the rafters are in place, the basic structure of the pergola is complete. The rest is up to you - accessorize according to your landscaping tastes. Then relax, read your “Home Life” magazine while you soak in a hot bath with some soothing Oil of Essence. (see figs. M & N)
 |
|
 |
| Fig. M |
|
Fig. N |
|
|