| | | | |
| |

|
|
Oooo… that Outdoor Fireplace is HOT! Come on, now, ANYONE can get a gas barbecue for the backyard. You can be more creative than that! An outdoor fireplace makes a landscaping statement and allows for really flavourful cooking.
 |
 |
 |
 |
 |
 |
|
 |
DO use firebrick, not regular brick, for the portion of the fireplace that is exposed to heat.
|
|
DON’T start building without laying a proper cement foundation. The blocks and bricks need a strong, level surface for support.
|
|
 |
 |
 |
 |
One Brick at a Time
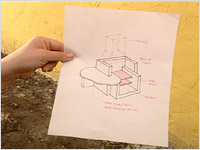
- The first step toward success on this project is a clear plan. Fill up your mug with fresh coffee and start drafting. You need to map out the size, height and placement of the fireplace. (see fig. A)
- Brigitte had her metal fireplace hood manufactured to spec at a local metal fabrication shop. When you draw up your plan, they can create what you want and even provide you with helpful advice if you need it.
- With a clear plan in mind, you can make the trip to the masonry store to buy your building supplies – blocks, bricks, and mortar.
 |
|
 |
| Fig. A |
|
Fig. B |
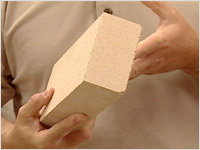
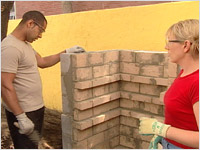
- Brigitte used cinder blocks for the basic structure of the fireplace. They are sturdy, inexpensive and easy to work with.
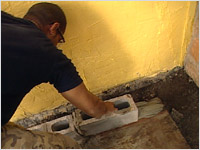
- Use firebrick to line the cinder block shell of the structure. These bricks are made of sand with special additives that can withstand temperatures up to 1250 F. (Hot air would get inside regular brick causing them to crack.) Firebricks also are made with no holes so they sit flat. (see fig. B)
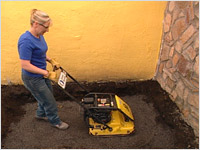
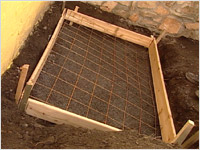
- With all your supplies, you’re ready to begin. Excavate an area slightly larger than the size of the finished fireplace. This hole needs to be 12 inches deep. Using the “Wacker” tamping machine, compact the excavated area.
- Fill the hole with 6 inches of gravel and compact it with the “Wacker.” You’re now ready to prepare for concrete. (see fig. C)
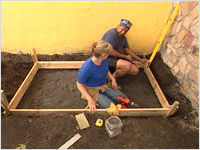
- Mark out the perimeter of the area with wooden spikes. Attach 1 x 6 boards to these to build a form to hold the cement. But don’t pour yet! (see fig. D)
 |
|
 |
| Fig. C |
|
Fig. D |
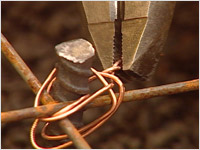
- Insert a reinforcing mesh the size of the excavated area into the hole. Use copper wire wrapped around pieces of rebar to hold the mesh in place. (At about the mid-level point) You don’t want it to drop when you pour the cement. (see figs. E and F)
 |
|
 |
| Fig. E |
|
Fig. F |
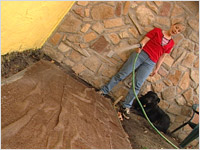
- Mix the concrete according to the package directions and pour into the concrete form. Level with a trowel. Cover it with a layer of burlap. Let it dry for a couple of days but you don’t want it to dry to quickly or it will crack. Wet the burlap occasionally to help to cure the concrete slowly. (see fig. G)
- When the concrete is dry, remove the burlap and the form and fill in the area around the concrete pad.
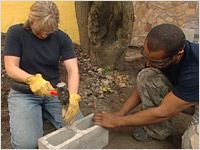
- You’re ready to start building but don’t be too hasty. Do a dry fit with the cinder blocks and the bricks to make sure everything is going to fit according to plan first. It’s better to find out about any problems before you’ve got mortar in place. (see fig. H)
 |
|
 |
| Fig. G |
|
Fig. H |
- If everything fits, remove the dry fit blocks and get ready to begin. Lay a chalk line along the edges to make sure the first row is straight.
- Mix the mortar to the consistency of porridge and lay a bed of about a half an inch of mortar on the cement pad around the base. Wet the blocks slightly so the mortar sticks better. Place the first row of blocks around the base. (see figs. I & J)
 |
|
 |
| Fig. I |
|
Fig. J |
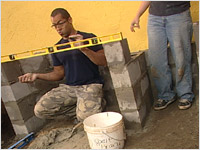
- Use a level to make sure that your work is even.
- You need to alternate the joints of the cinder blocks as you build upwards. This provides strength and stability. This may mean that you have to cut the cinder blocks in half. To do this, use a hammer and a masonry chisel to score the block. Then start with gentle “love taps” and progressively hit the block a little harder until it breaks along the line. (see fig. K)
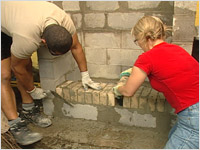
- On the second row start with the cut block so that the joints are staggered. Slightly wet each block on the bottom then apply a layer of mortar. Then “chop” the mortar with the edge of the trowel before placing the brick. This brings air into the mortar and creates suction to hold the block in place. Wipe of any excess mortar off with the trowel.
- Level, level, level. (see fig. L)
 |
|
 |
| Fig. K |
|
Fig. L |
- Continue building, remembering to alternate the joints, until the cinder blocks are the right height.
- When the fireplace shell is complete, you can start to place the firebricks. Start with a flat layer on the floor of the fireplace. Apply a thin layer of mortar to the cinder blocks on the bottom. Wet each firebrick slightly and then “back butter” with about a half an inch of mortar. Place the brick and wiggle into place. Wipe off any excess mortar with the trowel. (see fig. M)
- Level, level, level.
- Build upwards, remembering to alternate the joints of the bricks. Brigitte used the firebricks to create the supports for her coal pan and grill. She started at the bottom, tucking the bricks up against the wall on their sides for three tiers. For the fourth tier, she turned the row of bricks flat so they would protrude and act as a perfect support for the coal pan. She continued this way for the grill support. (see fig. N)
 |
|
 |
| Fig. M |
|
Fig. N |
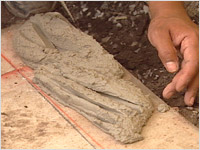
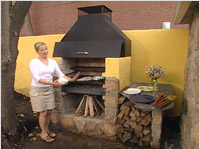
- With the basic structure of the fireplace complete the finishing touches are up to you. Brigitte chose a large slab of natural stone to act as a shelf beside her fireplace. To place this, she applied a layer of mortar on top of the cinderblocks and slid the stone into place. She then opted to finish the front with “Cultured Stone” that matches the wall adjacent to the fireplace.
- To cover the cinder blocks that still showed on the outside, Brigitte chose to use parging. (This means to apply a layer of cement to the wall to create a smooth surface.) After the parging dried for a couple of days, she used an exterior masonry paint to match her fireplace to her “Spiced Butternut” stucco wall.
- While the parging was curing, (she remembered to wet it periodically) Brigitte painted her metal fireplace hood with heat resistant paint. With the blocks, the bricks, the stones and the parging complete, Brigitte placed the range hood, gathered up the firewood and got ready to throw the fish on the fire. (see fig. O)
 |
| Fig. O |

| Cement and coordination of their Masonry Suppliers |
|
Merkley’s
100 Bayview Rd.
Ottawa, ON K1Y 4L6
613-728-2693
|
Cinder blocks available at Merkley Supply Ltd.
|
|
Permacon
|
Cultured Stone available at Merkley Supply Ltd.
|
|
Cultured Stone
1-800-255-1727
|
Cultured stone (manufacturer)
|
|
Canadian Stone Industries
1-800-977-8663
|
Cement available at Merkley Supply Ltd.
|
|
St. Lawrence Cement
1-800-268-5373
|
| Architectural technologist |
|
Construction LinesInc.
Brian Sindall
613-913-3277
|
| Ottawa RV rental |
|
RV Power Sport
2098 Prince of Wales Dr.
Ottawa, ON K2E 7E5
1-888-587-8854
|
|
|
|