| | | | |
| |

|
|
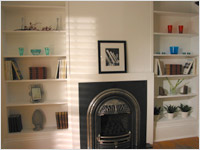
Well done wall unit. Brigitte’s new fireplace needed some wall units to frame it – and provide her with an excellent place for her favourite treasures.
 |
 |
 |
 |
 |
 |
|
 |
DO have an awesome tool belt, like Anthony’s. Just because it feels goooood.
|
|
DON’T start without a plan. You need to know exact measurements and exactly how the finished product looks.
|
|
 |
 |
 |
 |
Sure Shelving
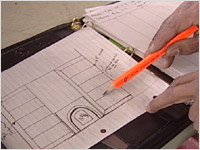
- Draw a plan of what you want your finished wall unit to look like. Measure the area and write down exact measurements for the gables and the shelves. (see fig. A)
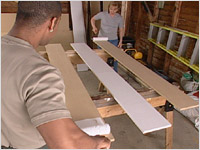
- Next, prepare a “cutting list” so that you know how many cuts you need to make. This list allows you to plan the maximum usage of the wood product you are using. Brigitte used medium density fibreboard (MDF) for her shelving unit.
- Cut two smaller pieces, 1 x 2 inches, to attach to the back of top shelf of the wall unit. These will be used to attach the wall unit to the studs.
 |
|
 |
| Fig. A |
|
Fig. B |
- When you make all the required cuts, you have the pieces you need for the finished product.
- Prime each piece so that the paint colour you choose is uniform. Then paint the finished colour. (see fig. B)
- Now you’re ready to put it all together. Measure carefully to mark where the shelves fit into the unit. Do a dry-fit to make sure everything looks just right.
- Apply wood glue to each end of the shelves and glue them to the sides of the wall unit. Secure with nails. If the edge of the shelf is exposed, fill the nail holes and paint. (see fig. C)
 |
|
 |
| Fig. C |
|
Fig. D |
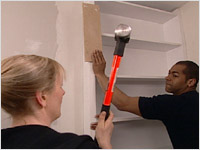
- It’s time to place the unit in the area. If you’ve measured right, it will fit perfectly. If it needs some gentle persuasion, place a 2 x 4 against the edge of the unit and gently hammer into place. (see fig. D)
- To attach it to the studs, pre-drill holes through the 1 x 2 inch piece at the top of each shelf. Screw into place.
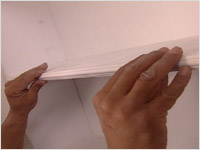
- If you choose to, you can jazz up the edges of the shelves with decorative facing pieces. Nail these into place. Cover the nail heads with mastic putty or Polyfilla and paint. (see fig. E)
- Take all those treasures out of the basement, show them off to all your friends and sit back and enjoy your creation. (see fig. F)
 |
|
 |
| Fig. E |
|
Fig. F |

| Gas fireplace, tools and location |
|
The Fireplace Center & Patio Shop
811 Boyd Ave.
Ottawa, ON K2A 2C8
613-728-1775
|
Valor fireplace (manufacturer) available at the Fireplace Center & Patio Shop. For other locations, please check their web site.
|
|
Miles Industries Ltd.
Valor Fireplaces
|
| Marble footing for fireplace |
|
Emerald Tile
2878 Sheffield Rd.
Ottawa, ON K1B 3V9
613-738-7841
|
|
|
|