| | | | |
| |

|
|
Brigitte loves to experiment with different looks. When she needs to find the perfect backdrop for her new chair, wallpaper seems to be the answer. Luckily she knows the basics for easy installation – and removal – of wallpaper.
 |
 |
 |
 |
 |
 |
|
 |
DO draw a level plumb line on your wall as a starting point.
|
|
DON’T wait until you’ve got the WHOLE wall done before your stand back and decide if you’re going to like it or not.
|
|
 |
 |
 |
 |
Rolling Along
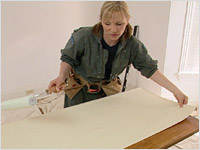
- If you don’t have a wallpaper table (and who does?) use an old door or a large piece of plywood to spread out the wallpaper for cutting.
- Measure the height of your wall and add four inches to arrive at the final length you need for each strip of wallpaper. Measure and mark this distance directly onto your table. This way you can just stretch the paper out on the table and cut – no need to measure every time.
- If your wallpaper has a pattern, mark the “top” of each piece so you don’t hang it upside-down!
- Before you hang your first piece, draw a plumb line down your wall. Place this plumb line so that your wallpaper will overlap the corner by one inch. For example, if your wallpaper is 20 inches wide, draw the plumb line 19 inches away from a corner.
- Don’t eyeball it. And don’t place your first piece of wallpaper using only your corners of the wall as a guide because they are often a little wonky, especially in Brigitte’s house.
 |
|
 |
| Fig. A |
|
Fig. B |
- Before you apply the wallpaper, roll the strips in the opposite direction from which they’ve been stored, to flatten them out.
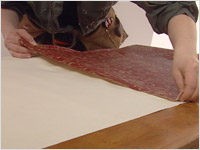
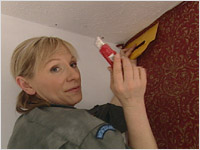
- Use an activator solution on pre-pasted wallpaper rather than the wallpaper bath technique. This makes the pieces easier to handle and prevents the strips from shrinking once applied. (see fig. A)
- Make sure the activator solution covers the entire back surface of the paper. You don’t want any dry spots. The corners are especially important.
- Once the activator is applied, “book” the strips of wallpaper. This means folding the paper up so that the moistened sides are facing each other to prevent them from drying out. (see fig. B)
- Leave the strips to relax for five minutes before applying
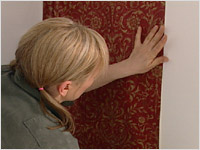
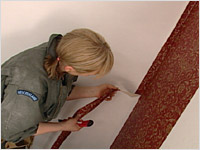
- Apply the first strip to the wall. Using a smoothing tool, start from the centre of the paper and smooth at an angle out to the edges. (see fig. C)
- Tuck the paper up tight against the ceiling, the corner and the bottom and trim the excess using a utility knife. (see fig. D)
 |
|
 |
| Fig. C |
|
Fig. D |
- Line up the pattern for the next piece and apply using the same technique. (see fig. E)
- To hang around window and doorframes, hang the paper from the ceiling over the opening, as if the window and door were not there. Firmly attach the wallpaper close to the ceiling and around the window or door and then cut away the excess with your utility knife.
 |
|
 |
| Fig. E |
|
Fig. F |
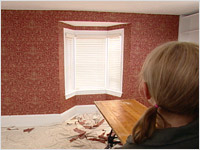
- You can fix any rips or holes using pieces cut from extra paper.
- Sit back and enjoy your newly papered walls! (see fig F)
- BUT, if you don’t like the overall look of the paper once you’ve got it on the wall – don’t live with your mistake! Be courageous and try something else.
|
|