| | | | |
| |

|
|
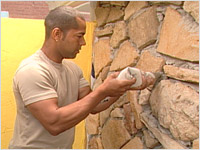
If you think creating a stoned wall requires lots of heavy lifting and crushed fingers, be prepared for a pleasant surprise. Today there are versatile products available that give a quality finish with much less effort. Brigitte chose to use “Cultured Stone” for her homage to Tuscany. These stones are man-made, about 1/3 the thickness of regular stone and much lighter. They give the appearance of natural stone but can be applied over existing walls without brick ledges.
 |
 |
 |
 |
 |
 |
|
 |
DO it yourself – no problem. But if you ask a friend to help, it’s more fun.
|
|
DON’T forget to mix up the shapes and sizes of the stones from the boxes. Variety provides a more pleasing look.
|
|
 |
 |
 |
 |
A Very Cultured Stone Wall
Bring the old country to your home!
- Measure the area that you want to cover with stone. Make note of window openings, door lintels and corners. Provide the masonry store with all the necessary information so that you end up with all of the right kinds of stone.
- You need a flat, smooth surface on which to apply the stone. Remove any window sills, lintels, edgings and eavestroughing.
- If the wall is not smooth, you can apply a layer of plywood over the entire surface.
 |
|
 |
| Fig. A |
|
Fig. B |
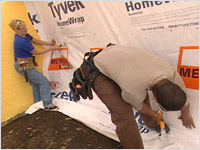
- Now that the wall is smooth, cover the entire surface with a home wrap, construction vapour barrier. Apply the sheeting over the entire surface and then cut out window and door openings later. (see fig. A)
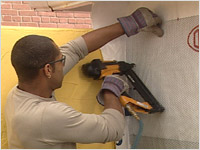
- The next step is the diamond mesh. Make sure that you apply the mesh right side up. If you run your hand along the surface, it is smooth in one direction, rough in the other. That is because the mesh has “cups” to hold the mortar in one direction. You want to hang the mesh so that the rough side is up. (see fig. B)
- Attach the diamond mesh over the entire surface using a air staple gun and then cut around openings with wire cutters later.
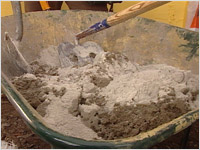
- You are now going to apply a layer of mortar over all of the mesh. The mortar is mixed at a ratio of 3:1 – three sand to one mortar. Add enough water to create a mortar of porridge consistency. (see fig. C)
 |
|
 |
| Fig. C |
|
Fig. D |
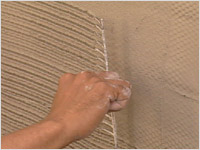
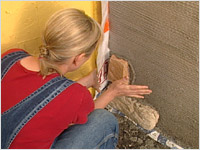
- Use a trowel to apply enough mortar to just cover the mesh. Work in sections. While the mortar is still damp, use a raking tool (no it’s not a hair pick, Brigitte) to do a “scratch coat” into the mortar. This means that you rake horizontal striations into the mortar. This creates a rough surface that helps the stones to adhere better. (see fig. D)
- When you’re finished you have a wall of mortar with horizontal striations. Let dry overnight.
- Now comes the fun part. Mix the mortar to be used for the placement of the stones.
- Brush on a small amount of water on to the back of the stone. Not too much! This helps the mortar to stick.
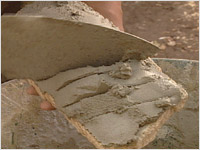
- “Back butter” the stones with a thick layer of mortar. Use the edge of the trowel to chop the mortar about every inch or so along the back of the stone. This puts air into the mortar to create suction when placed on the wall. (see fig. E)
 |
|
 |
| Fig. E |
|
Fig. F |
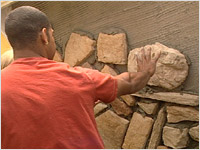
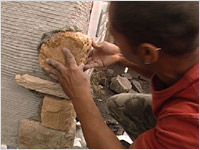
- Place the stone, wiggle it a little and then let go. Presto! (see fig. F)
- Now do it several hundred more times. Leave some space between each stone for mortar. (see fig. G)
- Manufacturers provide special stones to use for corners, and for around windows and doors. You can cut stones to fit, if desired.
 |
|
 |
| Fig. G |
|
Fig. H |
- Corner stones come with various lengths of “legs” that wrap around the edge of the wall. When applying these stones, alternate a short leg with a long leg up the wall for a more pleasing effect. (see fig. H)
- When all the stones are in place, you need to fill in the joints between each one. You can use a grouting bag (just like icing a cake!) or a trowel. Smooth the mortar with your fingers or a brush, depending on the look you want to create. (see fig. I)
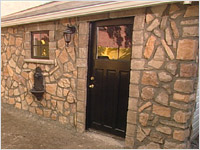
- Just like that, you have brought the old country to your home. Pull up your chair, grab a cup of coffee and sit back and admire your work. (see fig. J)
 |
|
 |
| Fig. I |
|
Fig. J |

Location, Coordination of Cultured Stone, Liquistone, St. Lawrence Cement, etc.
|
|
Merkley Supply Ltd.
100 Bayview Rd.
Ottawa, ON K1Y 4L6
613-728-2693
|
Cultured Stone (regional representative) available at Merkley Supply Ltd.
|
|
Cultured Stone
1-800-255-1727
|
Cultured stone (manufacturer)
|
|
Canadian Stone Industries
1-800-977-8663
|
Liquistone available at Merkley Supply
|
|
Niagara Protective Coating
905-356-1581
|
Cement available at Merkley Supply
|
|
St. Lawrence Cement
1-800-268-5373
|
| Lion head fountain |
|
Tivoli Florist
282 Richmond Road,
Ottawa, ON K1Z 6X2
613-729-6911
|
| Electrician |
|
Aastar Electrical
5509 Canotek Rd.
Cumberland, ON K1J 9J9
613-744-3200
|
| Tuscan costume |
|
Costumes Unlimited
910A Clyde Ave.
Ottawa, ON K1Z 5A5
613-728-2823
|
|
|
|